Guest network
How to connect to the guest network
How to connect to the guest network:
- Choose USN-guest from the list of available wireless networks on your device
- Launch a web browser. (Chrome, Edge, Safari, etc.)
- In the browser you go to a web page, e.g. www.usn.no
- You will be automatically redirected to the university's guest page for guest networks.
- Register with your mobile number to receive a password via SMS.
- Then write the password you received in the box "Login with SMS password" on the login page and then press "Login".
You now have internet access on your device.
Eduroam
Windows
- Click on the network icon in the lower right corner of the screen
- Select eduroam in the list of networks and press connect
- Log in with username@usn.no and password
If the above procedure did not work, you can try automatic setup of the eduroam wireless network.
Mac
- Click on the Wi-Fi symbol at the top right of the screen
- Select "Eduroam" from the list
- Fill in username@usn.no and password
- In the box that pops up, select "Show Certificate"
- Verify that it is the correct certificate:
"radius.usn.no" or "radius1.usn.no" and that the certificate has been issued by the AAA Certificate Service - Select "Always accept" if the information matches the info above
Press "Continue" - After this you will be asked for your username and password. This is the same as you use when logging in to the computer.
If the above procedure did not work, you can try automatic setup of the eduroam wireless network.
iPhone
- Go to settings
- Select "Wi-Fi"
- Choose "Eduroam"
- Log in with username@usn.no and password
- Make sure that the certificate is issued by "radius.usn.no" and "AAA Certificate Services"
- Select "Approve"
If the above procedure did not work, you can try automatic setup of the eduroam wireless network.
Android and Chromebook
- Go to Settings
- Select "Wi-Fi"
- Choose "Eduroam"
- Log in with username@usn.no og password
Select / define the rest of the settings:
EAP method: PEAP
Phase 2 approval: MASCHAPV2 (may be below advanced)
CA certificate: Do not approve / Do not confirm
Domain: usn.no (some phones will not need domain)
Identity: username@usn.no og password - Click «Connect»
If the above procedure did not work, you can try automatic setup of the eduroam wireless network.
Ubuntu
- Tap the network icon in the taskbar and select Eduroam
- Select CA certificate
- Select the disk on your PC
- Get to «etc / ssl / certs» and select «Comodo_AAA_services_root.pem»
Select / define the rest of the settings:
Wi-Fi security: WPA & WPA2 Enterprise
Authentication: Protected EAP (PEAP)
Anonymous Identity: Nothing
PEAP version: Automatic
Inner authentication: MSCHAPv2
Username: username@usn.no
Password: The password you selected when registering your account
5. Click “Connect”
If the above procedure did not work, you can try automatic setup of the eduroam wireless network.
Troubleshooting
General troubleshooting for all devices
- Is the wireless network card turned on? Many laptops have their own button for this
- Did you enter the correct username and password? If you are unsure what your username or password is, contact IT
Windows - Forget the network
1. Click the network icon in the lower right corner of the screen
2. Right-click on eduroam in the list of networks and select "Forget"
Windows - Manually connect to Eduroam
1. Right-click on the wireless icon
2. Press «Open Network and Sharing Center»
3. Choose “Set up a new Connection or network”
4. Then “Manually connect to a wireless network”
5. Fill in:
a. eduroam onNetwork name
b. Choose «WPA2-Enterprise» as Security type
c. Encryption type should be «AES»
d. Then press Next
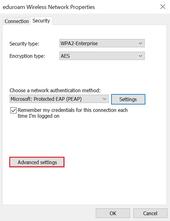
6. Choose «Change connection settings»
7. Go to the «Security» tab
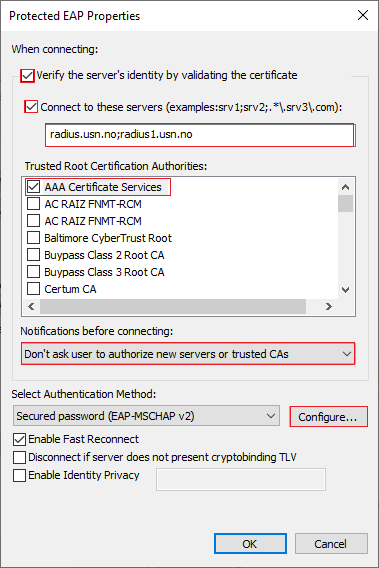
8. Press «Settings»
a. Tick «Verify the server’s identity by validating the certificate»
b. Tick“Connect to these servers” and enter "radius.usn.no;radius1.usn.no
c. "AAA Certificate services" under Trusted Root Certification Authorities
d. Select “Don’t ask user to authorize new server or trusted CAs” under Notification before connecting
e. Click «configure»

9. Uncheck «Automatically use my Windows logon name and passord (and domain if any)»
10. ClickOK
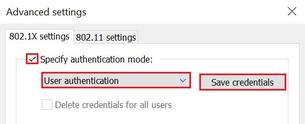
11. Press “Advanced settings”

12. Tick “Specify authentication mode
13.Choose “User authentication”
14. Press “Save credentials”

14. Enter your username@usn.no og password
Delete and add a new eduroam profile
Windows 10
- Open Manage Wireless Networks by clicking Start and then clicking Control Panel.
In the search box, type wireless, and then click Manage Wireless Networks. - Click on "eduroam" and then on Remove. You will receive a message asking you to confirm that you want to remove the profile. Confirm that you want to remove the profile.
For USN computers, there is a quick fix:
Select Windows Start at the bottom left.
Type: "Forget Eduroam WiFi" and click on: Forget Eduroam WiFi
Mac:
- Select Profiles in System Preferences.
Press the button and see if you can find a profile named "eduroam". If necessary, highlight this and press the "minus" button below. Confirm the removal with your Mac account. - Open Keychain Access. Search and delete all entries that come up for the following:
- radius.usn.no
Ubuntu:
1. Select the network icon in the taskbar and select «Edit connections…»
2. Select eduroam and click «Delete»
iPhone/iPad:
If the profile is entered with eduroamCAT, you must delete both the profile and from Wi-Fi settings on the phone.
Delete profile:
1. Go to setting
2. Select General
3. Select Profiles
4. Select eduroam
5. Click Remove Profile
Delete from Wi-Fi settings:
1. Go to settings
2. Select Wi-Fi
Click next to eduroam and click «Forget network»
Android:
If the profile is entered with eduroamCAT, you must delete the profile both from the eduroamCAT app and from settings on the phone.
eduraomCAT:
1. Launch the eduroamCAT app and select Profiles. Click the "Remove Profile" button.
2. Then go to the phone settings
3. Connections
4. Select Wi-Fi
5. Click on the eduroam-associated entry
6. Select Forget